Solr is a Lucene indexing server. Dovecot communicates to it using HTTP/XML queries. With this indexing server, you can do text searches in your emails.
- Download latest version: v. 9.10.1
- Solr documentation page
- Solr FTS Engine documentation page for Dovecot
- Configuring the FTS plugin in dovecot
Changelog
- Feb 8, 2026
- upgraded to v 9.10.1 - Mar 5, 2025
- version 9.8.0 requiresSOLR_OPTS="$SOLR_OPTS -Dsolr.config.lib.enabled=true"in solr.in.sh
Upgrading to version 9.10.x
- More info here
Dovecothas recently released the schema files updated to version 9, alternative to the ones that you can find here
Before starting check that your java is at least at version 11.
Download latest version:
SOLR_VER=9.10.1
wget https://www.apache.org/dyn/closer.lua/solr/solr/${SOLR_VER}/solr-${SOLR_VER}.tgz?action=download -O solr-${SOLR_VER}.tgz
Then stop your Solr server and run the upgrade with the -f (upgrade) and -n (do not start the server when finished) options:
tar xzf solr-${SOLR_VER}.tgz solr-${SOLR_VER}/bin/install_solr_service.sh --strip-components=2
sudo bash ./install_solr_service.sh solr-${SOLR_VER}.tgz -f -n
Slackware users will have to do:
wget https://notes.sagredo.eu/files/qmail/solr/install_solr_slackware.sh
chmod +x install_solr_slackware.sh
./install_solr_slackware.sh solr-${SOLR_VER}.tgz -f -n
Now download and install the new schema and configuration files for Dovecot
cd /var/solr/data/dovecot/conf
rm -f schema.xml managed-schema.xml solrconfig.xml
wget https://raw.githubusercontent.com/dovecot/core/refs/heads/main/doc/solr-schema-9.xml -O schema.xml
wget https://raw.githubusercontent.com/dovecot/core/refs/heads/main/doc/solr-config-9.xml -O solrconfig.xml
chown solr:solr solrconfig.xml schema.xml
The new configuration file replaces LRUCache with CaffeineCache and changes the location of the .jar libraries (diff here).
Configure your /etc/default/solr.in.sh file, as many options are changed.
We have to enable the config libs as described here (to solve an error on running the Dovecot schema). Edit the file /etc/default/solr.in.sh and add a line like this:
SOLR_OPTS="$SOLR_OPTS -Dsolr.config.lib.enabled=true"
Then restart the Solr server.
Finally upgrade the indexes (edit the downloaded script to insert your Dovecot password)
wget https://notes.sagredo.eu/files/qmail/solr/solr_rescan_index.sh
chmod +x solr_rescan_index.sh
chown root:root solr_rescan_index.sh
chmod o-wrx solr_rescan_index.sh

./solr_rescan_index.sh
Stopping Dovecot
.
<?xml version="1.0" encoding="UTF-8"?>
<response>

<lst name="responseHeader">
 <int name="status">0</int>
 <int name="QTime">20</int>
</lst>
</response>
Starting Dovecot.
If the script does not return errors (status=0) you are ok. If you get errors, double check the Authorization and the Solr's dovecot user credentials.
Installing
Solr is a java servlet which requires openjdk v. 11 or later.
# java -version
openjdk version "17.0.10" 2024-01-16
OpenJDK Runtime Environment (build 17.0.10+7)
OpenJDK 64-Bit Server VM (build 17.0.10+7, mixed mode, sharing)
Be sure that you have the java binary in your path and that you have defined the variable JAVA_HOME, for example
PATH=$PATH:/usr/lib64/java/bin/
JAVA_HOME=/usr/lib64/java/
Download the binary version of Solr and install
SOLR_VER=9.10.1
wget https://www.apache.org/dyn/closer.lua/solr/solr/${SOLR_VER}/solr-${SOLR_VER}.tgz?action=download -O solr-${SOLR_VER}.tgz
Extract the installer from the archive and run it. The installer will work for most Linux distributions based on systemd.
tar xzf solr-${SOLR_VER}.tgz solr-${SOLR_VER}/bin/install_solr_service.sh --strip-components=2
sudo bash ./install_solr_service.sh solr-${SOLR_VER}.tgz
The server will be launched by systemd at boot time.
Installing on Slackware
If you are a Slackware user like me, the installer will not work. Use instead my modified install_solr_slackware.sh script to do the installation:
wget https://notes.sagredo.eu/files/qmail/solr/install_solr_slackware.sh
chmod +x install_solr_slackware.sh
./install_solr_slackware.sh solr-${SOLR_VER}.tgz
Configuration
The location of the server is /opt/solr, while the logs are in /var/solr/logs.
The servers' configuration file is stored in /opt/solr/bin/solr.in.sh.orig file, which is conveniently copied to /etc/default/solr.in.sh so that we can keep it after a future upgrade. Be aware that the double quotes are important in this file.
SOLR_TIMEZONE="Europe/Rome"
SOLR_IP_ALLOWLIST="127.0.0.1, 10.0.0.0/24"
SOLR_JETTY_HOST="10.0.0.152"
SOLR_SECURITY_MANAGER_ENABLED=true
SOLR_OPTS="$SOLR_OPTS -Dsolr.allowUrls=http://solr.yourdomain.tld:8983"
SOLR_PID_DIR="/var/solr/data"
SOLR_HOME="/var/solr/data"
SOLR_OPTS="$SOLR_OPTS -Dsolr.config.lib.enabled=true"
SOLR_IP_ALLOWLIST allows connections from my DMZ. Be aware that SOLR_IP_ALLOWLIST was SOLR_IP_WHITELIST before version 9.
Setting SOLR_JETTY_HOST="10.0.0.152" (the localnet IP of the Solr server) was a little difficult to guess for me, because I have Solr in a different virtual server than qmail and apache. It allows Solr to accept connections from the outnet. If you have all the servers in the same host, you can leave SOLR_JETTY_HOST=127.0.0.1 commented out.
SOLR_PID_DIR="/var/solr/data" solved me an issue where the pid file cannot be saved in solr/bin due to priviledge problems.
SOLR_HOME="/var/solr/data" will get Solr to store the core data (dovecot data in particular) on a separate directory. This is convenient to ease future upgrades where this directory should not be relocated.
SOLR_OPTS="$SOLR_OPTS -Dsolr.config.lib.enabled=true" enables the config libs as described here to solve an error on running the Dovecot schema.
Setting the limits
Solr will run as the user solr:solr, which is created for you during the installation process. This user will ask to raise the open file limit up to 65000. In my Slackware the default limit is 1024. To increase the limit for the solr user edit your /etc/security/limits.conf or add a solr.conf file in your limits.d folder with the following instructions:
solr    soft    nofile  65536
solr    soft    nproc   65536
solr    hard    nofile  65536
solr    hard    nproc   65536
In my case solr lives in an LXC unprivileged container, so the above limit had to be set not only for the solr user inside the container, but also in the host for the user who runs the container itself. In addition, the container must have this option in its config file:
lxc.prlimit.nofile = 65536
Running
We are ready to run the server or restart if it's already running:
sudo systemctl stop solr
sudo systemctl start solr
sudo systemctl status solr
Slackware users will do as follows (the install script already installed the init script in your rc.local):
/etc/init.d/solr start
sleep 5
/etc/init.d/solr status
For our convenience let's create a symbolic link to the init script:
ln -s /etc/init.d/solr /usr/local/bin/solrctl
Dovecot core setup
- fts-solr plugin documentation
solrconfig and shema shipped bydovecot
To use Solr with Dovecot, it needs to be configured specifically (Solr must be running):
sudo -u solr /opt/solr/bin/solr create -c dovecot
The data and the configuration files for Dovecot are under /var/solr/data/dovecot.
The official Dovecot documentation recommends to change a couple of configuration files:
cd /var/solr/data/dovecot/conf
rm -f schema.xml managed-schema.xml solrconfig.xml
wget https://raw.githubusercontent.com/dovecot/core/refs/heads/main/doc/solr-schema-9.xml -O schema.xml
wget https://raw.githubusercontent.com/dovecot/core/refs/heads/main/doc/solr-config-9.xml -O solrconfig.xml
chown solr:solr solrconfig.xml schema.xml
The managed-schema file is generated based on schema.xml.
We already compiled Dovecot with the Solr support (--with-solr configuration). Add the plugin in the 10-mail.conf file:
mail_plugins {
 fts = yes
 fts_solr = yes
}
and add the configuration in the 90-fts.conf file (overwrite the url part in your local.conf):
fts_autoindex = yes
fts_autoindex_max_recent_msgs = 999
fts_search_add_missing = yes

## for solr
# overwritten by local.conf
fts solr {
 url = http://127.0.0.1:8983/solr/dovecot/
}

# default language for solr
language en {
 default = yes
}
# add your regional language
#language it {
 # you can have only one default language
 # default = no
#}
change 127.0.0.1 to where Solr is reachable.
You are now ready to use your Solr indexing engine.
Control panel setup
General settings are available also via web panel. You have to setup a virtual domain where Solr will be listening. This is how to configure an apache virtual host to serve the control panel. I have set a proxy to connect via regular port 443.
<VirtualHost *:443>
       SSL stuff here
       ServerName solr.mydomain.tld

       ErrorLog ${LOGDIR}/solr_error.log
       LogLevel warn
       CustomLog ${LOGDIR}/solr_access.f2b.log combined

       SSLProxyEngine On
       ProxyRequests Off
       ProxyPass        / http://solr.mydomain.tld:8983/
       ProxyPassReverse / http://solr.mydomain.tld:8983/
</VirtualHost>
When you navigate to https://solr.mydomain.tld you will see that the control panel does not require any login and that it complains of the lack of any security policy.
Securing
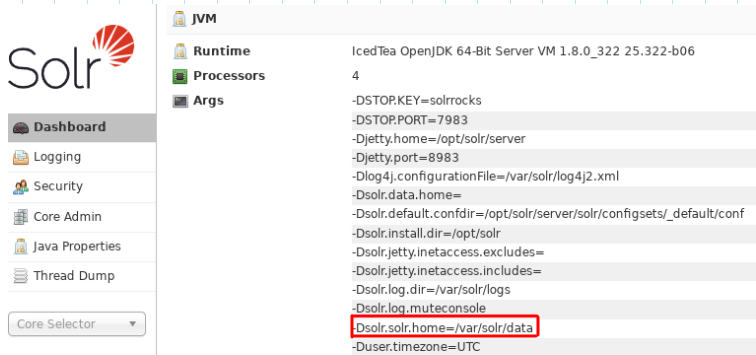
Look to where your solr.home environment variable is set by navigating to the dashboard:
Change to that directory and install a security.json file which will define your plugins for authentication, authorization and auditlogging:
cat > /var/solr/data/security.json << __EOF__
{
"authentication":{
"blockUnknown": true,
"class":"solr.BasicAuthPlugin",
"credentials":{"solr":"IV0EHq1OnNrj6gvRCwvFwTrZ1+z1oBbnQdiVC3otuq0= Ndd7LKvVBAaZIF0QAVi1ekCfAJXr1GGfLtRUXhgrF8c="},
"realm":"My Solr users",
"forwardCredentials": false
},
"authorization":{
"class":"solr.RuleBasedAuthorizationPlugin",
"permissions":[{"name":"security-edit","role":"admin"}],
"user-role":{"solr":"admin"}
},
"auditlogging":{
"class": "solr.SolrLogAuditLoggerPlugin",
"async": true,
"blockAsync" : false,
"numThreads" : 2,
"queueSize" : 4096,
"eventTypes": ["REJECTED", "ANONYMOUS_REJECTED", "UNAUTHORIZED", "COMPLETED", "ERROR"]
}
}
__EOF__
chown solr:solr /var/solr/data/security.json
chmod o-r /var/solr/data/security.json
Now restart the server and you should be able to login. The login user is 'solr', with a temporary password 'SolrRocks'. Change it after your first login.
The security section suggests to fix some permission issues. In addition, you have to create a "dovecot" user and grant it read and update permissions in order to perform its tasks. Do not use special characters like "@" in your password, because you can have parsing failures in the dovecot connection.
This is my set up:
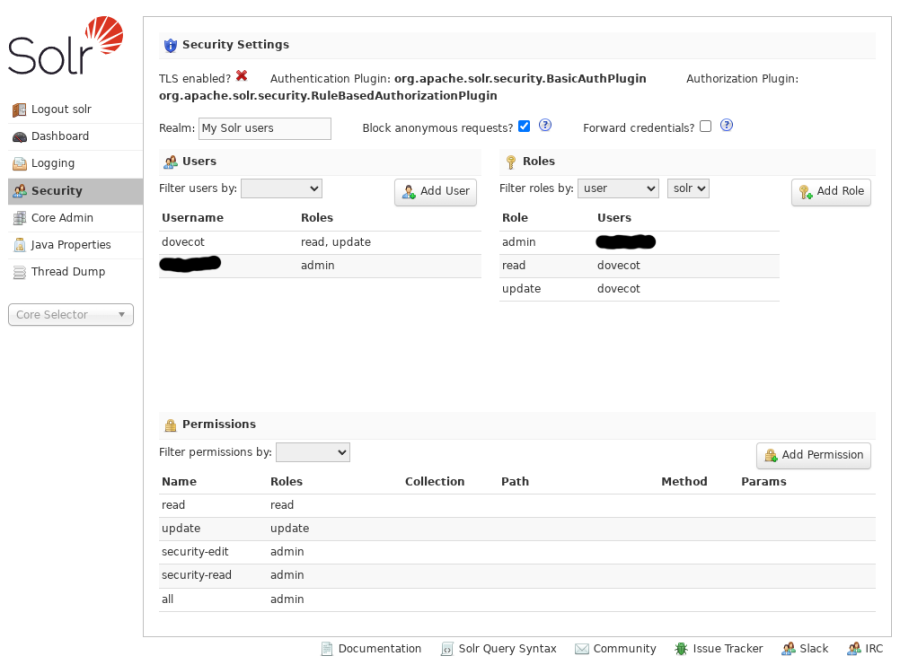
I have TLS disabled since the connection between the apache proxy and the Solr server is via http.
From now on, you can manage users, roles and permissions acting on the control panel rather than editing the above security.json file, which will be modified for you.
Now that we have secured the Dovecot's user connection to the Solr server, we must adjust the 90-plugin.conf file:
plugin {
fts = solr
fts_solr = url=http://dovecot:password@solr.mydomain.tld:8983/solr/dovecot/
# eventually add debug to the previous line

...
}
note the dovecot:password which are the credentials for the Solr's user dovecot.
Testing
# telnet 0 143
Trying 0.0.0.0...
Connected to 0.
Escape character is '^]'.
* OK [CAPABILITY IMAP4rev1 SASL-IR LOGIN-REFERRALS ID ENABLE IDLE LITERAL+ STARTTLS AUTH=PLAIN AUTH=LOGIN] Dovecot ready.
a login user@mydomain.tld password
a OK [CAPABILITY IMAP4rev1 SASL-IR LOGIN-REFERRALS ID ENABLE IDLE SORT SORT=DISPLAY THREAD=REFERENCES THREAD=REFS THREAD=ORDEREDSUBJECT MULTIAPPEND URL-PARTIAL CATENATE UNSELECT CHILDREN NA
MESPACE UIDPLUS LIST-EXTENDED I18NLEVEL=1 CONDSTORE QRESYNC ESEARCH ESORT SEARCHRES WITHIN CONTEXT=SEARCH LIST-STATUS BINARY MOVE SNIPPET=FUZZY PREVIEW=FUZZY PREVIEW STATUS=SIZE SAVEDATE LI
TERAL+ NOTIFY SPECIAL-USE QUOTA] Logged in
a select Inbox
* FLAGS (\Answered \Flagged \Deleted \Seen \Draft NonJunk $MDNSent Junk $label3 $Forwarded)
* OK [PERMANENTFLAGS (\Answered \Flagged \Deleted \Seen \Draft NonJunk $MDNSent Junk $label3 $Forwarded \*)] Flags permitted.
* 308 EXISTS
* 0 RECENT
* OK [UIDVALIDITY 1285590712] UIDs valid
* OK [UIDNEXT 19895] Predicted next UID
* OK [HIGHESTMODSEQ 31675] Highest
a OK [READ-WRITE] Select completed (0.001 + 0.000 secs).
a SEARCH text "SearchString"
* SEARCH 35 50 51 55 56 57 58 62 63 74 75 76 77 121 129 130 146 150 151 158 163 164 165 173 196 201 202 203 213 225 226 227 228 230 231 232 249 250 262 263 264 289
a OK Search completed (0.309 + 0.001 + 0.043 secs).
a logout
Open your dovecot log and be sure that there are no errors. Then look at the Solr's logs. This is a clean /var/solr/logs/solr.log:
2025-01-13 17:47:31.708 INFO  (qtp586358252-25-null-2) [   dovecot] o.a.s.c.S.Request webapp=/solr path=/select params={q={!lucene+q.op 3DAND}subject:SearchString+OR+from:SearchString&fl=uid,score&sort=uid+asc&fq=%2Bbox:8d8b8834b06ec94c57320000364df272+%2Buser:user@mydomain.tld&rows=75933&wt=xml} hits=0 status=0 QTime=8
2025-01-13 17:47:31.711 INFO  (audit-9-thread-1) [   ] o.a.s.s.SolrLogAuditLoggerPlugin type="COMPLETED" message="Completed" method="GET" status="200" requestType="SEARCH" username="dovecot" resource="/select" queryString="wt=xml&fl=uid,score&rows=75933&sort=uid+asc&q=% 7b!lucene+q.op%3dAND%7dsubject:SearchString+OR+from:SearchString&fq=%2Bbox:8d8b8834b06ec94c57320000364df272+%2Buser:user@mydomain.tld" collections=[]
and this is the request on the log file /var/solr/logs/YYYY_MM_DD.request.log. You can see that it was served correctly with a final 200 code:
10.0.0.4 - - [13/Jan/2025:16:51:19 +0000] "GET /solr/dovecot/select?wt=xml&fl=uid,score&rows=75934&sort=uid+asc&q=%7b!lucene+q.op%3dAND %7dsubject:SearchString+OR+from:SearchString&fq=%2Bbox:8d8b8834b06ec94c57320000364df272+%2Buser:user@mydomain.tld HTTP/1.1" 200 582
If you see a 451 error code you have to double check the authorizations.
When doing searches from Mozilla Thunderbird, be aware that the quick search works only on messages indexed locally by Thunderbird. For using solr you have to use the "Search Messages" function (Ctrl+M+F) and check the option "do search on server".
Rebuilding the index
If the query doesn't find anything, expecially after a change in the server as in the following case, where nothing follows the SEARCH result
a SEARCH text "SearchString"
* SEARCH
a OK Search completed (0.309 + 0.001 + 0.043 secs).
then you may want to rebuild the index for all '*' users:
doveadm fts rescan -u '*'
Now solr returns the position of the messages containing "SearchString" in the index.
a SEARCH text "SearchString"
* SEARCH 347 1308 1310 1338 1339
a OK Search completed (0.014 + 0.000 + 0.001 secs).

Comments
Solr Security Panel
RPRoss3 February 4, 2026 21:11 CET
Installed Solr 9.10.1 with this security.json
{"authentication":{
"blockUnknown": true,
"class": "solr.BasicAuthPlugin",
"credentials":{"solr": "cHFNAKbTL930UaGklonJT02g/NVUSbUc0cn2ssvV5sA= xG5Fa6oifv6deIHWnRSus4hxfq5mOxTwdwy9GZDeHgc="}
},
"authorization":{
"class": "solr.RuleBasedAuthorizationPlugin",
"user-role":{"solr": "admin"},
"permissions": [
{"name": "security-read", "role": "admin"},
{"name": "security-edit", "role": "admin"},
{"name": "all", "role": "admin"}],
},
"auditlogging":{
"class": "solr.SolrLogAuditLoggerPlugin",
"async": true,
"blockAsync" : false,
"numThreads" : 2,
"queueSize" : 4096,
"eventTypes": ["REJECTED", "ANONYMOUS_REJECTED", "UNAUTHORIZED", "COMPLETED", "ERROR"]
}
}
I am unable to access the Security Panel with an error
You do not have permission to view the security panel.
I've already addedd the 2 security-**** permissions before the "all" permission to no avail.
Any suggestions?
Thanks. Robert
Reply | Permalink
Solr Security Panel
Roberto Puzzanghera RPRoss3 February 5, 2026 15:29 CET
Hi, it depends on the user who is logging in. By default only the Solr user has the admin role and can access the security panel.
Reply | Permalink
Solr Security Panel
RPRoss3 Roberto Puzzanghera February 5, 2026 18:53 CET
I have only added the default Solr user and password. The account has the admin role and specific access to security-read and security-edit.
Reply | Permalink
Solr Security Panel
Roberto Puzzanghera RPRoss3 February 5, 2026 18:56 CET
Was the Solr user added by you ot it is the default Solr (pwd SolrRocks) account? I would suggest to delete the security.json file and create it from scratch
Reply | Permalink
This is a perfect guide for installations of Dovecot < 2.4, but it breaks on >= 2.4.
DJSnoopy October 10, 2025 07:55 CET
This is a perfect guide for installations of Dovecot < 2.4, but it breaks on >= 2.4.
Reply | Permalink
This is a perfect guide for installations of Dovecot < 2.4, but it breaks on >= 2.4.
Roberto Puzzanghera DJSnoopy October 10, 2025 09:37 CET
I think this isn't a perfect guide, either for versions <2.4 or 2.4. I also think everyone could contribute to improving it by posting the exact context where something doesn't work (and maybe even a solution) rather than just pointless criticism. That's how this place (and many others) has evolved over time.
Reply | Permalink
This is a perfect guide for installations of Dovecot < 2.4, but it breaks on >= 2.4.
DJSnoopy Roberto Puzzanghera October 10, 2025 11:20 CET
Why so negative? That wasn´t meant as critisism.
I just wanted to inform that the config syntax has had a hard change with 2.4 and a lot of plugin, ssl and auth configurations are not working anymore.
I´ve stumpled over the problem myself just this morning after an update of dovecot.
I´ll try to figure out how to rework the config next week. When i´ve found a solution, i´ll keep you updated so can update / extend your inspiring guide.
Just again. I love your site and sorry if you picked it up as critic what was not my intention.
Reply | Permalink
This is a perfect guide for installations of Dovecot < 2.4, but it breaks on >= 2.4.
Roberto Puzzanghera DJSnoopy October 10, 2025 12:49 CET
Are we talking about dovecot or solr? Concerning dovecot, my configuration was completely revised after the 2.4 release. It works here and in other servers were i have installed it. Please send your configuration and let me know what exactly is not working for you
Reply | Permalink
Need help with Dovecot + Solr performance
Arvind Goel July 17, 2025 23:44 CET
We have a Linux server running dovecot. Server is able to handle all current mailboxes and connections, but when we do a search the CPU load spikes to 100% and search results are incomplete/show failures in the email client.
This has been working fine for years until a few days ago when this problem started. Need to figure out if it's a server capacity, mailbox size, search index or other issue? Solr index database size is 40GB. Do we need to upgrade the machine or is this a Solr config issue... etc. Is this something anyone here can help with?
Reply | Permalink
Need help with Dovecot + Solr performance
Roberto Puzzanghera Arvind Goel July 18, 2025 15:25 CET
What do you have in /etc/security/limits.conf?
Reply | Permalink
Need help with Dovecot + Solr performance
Arvind Goel Roberto Puzzanghera July 18, 2025 17:04 CET
Thanks Roberto, here it is:
solr hard nofile 65535
solr soft nofile 65535
solr hard nproc 65535
solr soft nproc 65535
Reply | Permalink
Debian 12 - Work with 9.4.1 version but not 9.5.0 and recent
Tom April 28, 2024 21:17 CET
Hi
thank for this tuto
Here, with 9.5.0 (or 9.6.0) / Debian 12, SOLR dont like the schema
With 9.4.1, it's ok, but after upgrade to 9.5.0 or fresh install, same error =>
Reply | Permalink
Debian 12 - Work with 9.4.1 version but not 9.5.0 and recent
Roberto Puzzanghera Tom April 29, 2024 14:57 CET
Can you post the entire java error on your solr.log please?
Reply | Permalink
Debian 12 - Work with 9.4.1 version but not 9.5.0 and recent
Tom Roberto Puzzanghera April 29, 2024 16:18 CET
Log of SOLR :
and
-----
Reply | Permalink
some errors ?
Ivelin Topalov March 1, 2024 11:37 CET
fails if security.json is active, so move
before explaining and activating security.json
must be:
else managed-schema.xml overrides downloaded schema and solr thhrows undefined field error
maybe to add /etc/init.d/solr start & in rc.local - directly in install_solr_slackware.sh
Reply | Permalink
some errors ?
Roberto Puzzanghera Ivelin Topalov March 1, 2024 12:09 CET
Thank you, I'll check it out
I think that this solr installation can be simplified a lot, also getting rid from the web interface
Reply | Permalink